Category Archives: troubleshooting

Ubuntu, touchscreen and dualscreen: HD Touchscreen on the left, laptop on the right

If you read about calibrating touchscreen with X11 and are capable of simple addition and division, you won’t have a problem building the transformation matrix and applying it. I won’t cover the same details on how to set the matrix using xinput set-prop since I just want to write down the resulting matrix and, perhaps, save people some time if they have a setup similar to mine.

To get the name of the device, open Terminal and punch in:

xinput

In the output I found that my “Acer T232HL”‘s input component is actually called “Advanced Silicon S.A CoolTouch(TM) System”. I can see all of its properties with:

xinput list-props Advanced Silicon S.A CoolTouch(TM) System

Since I’ve set up the screen to be on the left site, that means top-left corner of my touch area is simply offset by 0,0, and bottom-right is 1920,1080. Considering that the total width of the usable X area is 1920+1280, I get 1920/3600=0.6 as the c0 constant on the above link.

My usable area’s height is max(1080, 800) (the respective y component of the resolutions of the two displays). Considering that touch area’s height is also 1080, then the c2 component does not need to be scaled and should be exactly 1.

I also have absolutely no offsets, so c1 and c3 stay 0.

Result:

xinput set-prop "Advanced Silicon S.A CoolTouch(TM) System" --type=float "Coordinate Transformation Matrix" 0.6 0 0 0 1 0 0 0 1
# And if needed, to make the display configured as described above:
xrandr --output DP-0 --auto --left-of LVDS-0

From the times when I was trying to get Linux to run on iPaq H3800 devices using the kernel and distributions published at the now-defunct handhelds.org, I remember the “tslib” which included a touchscreen calibration tool. I wonder if that can and should be used to calibrate the modern multitouch displays.

Update (April 5th 2014): I just dug out package ‘xinput_calibrator’ by random googling, but have not tried it out yet.
Ubuntu 13.10 live CD: Blank screen with EFI

Ubuntu 13.10 fails to start X11 on a Macbook Pro with retina display, and it fails to start X11 on VirtualBox when EFI mode is turned on. Even the failover mode fails. This has been tried with 64-bit version of Ubuntu 13.10. Machines: a 2013 Macbook Pro; and a virtual VirtualBox 4.3.6 machine configured for Ubuntu (64-bit) OS, with EFI turned on.

Ubuntu’s failover configuration tries to use vesa module, which is not available when running under native EFI or UEFI mode.

Let’s fix this by using fbdev module.

  1. Hit ctrl+alt+f1 to switch to console.
  2. Type sudo -i to become root.
  3. Now let’s fix the relevant files:
    cd /etc/X11/
    sed 's/Driver.*"vesa"/Driver "fbdev"/' xorg.conf.failsafe > xorg.conf
  1. Restart X11 et al: service lightdm restart
  2. If necessary, switch to the VT dedicated to X11: hit ctrl+alt+f7

Note that the screen will stay blank for a while longer; give the system some time to proceed.

Good luck!

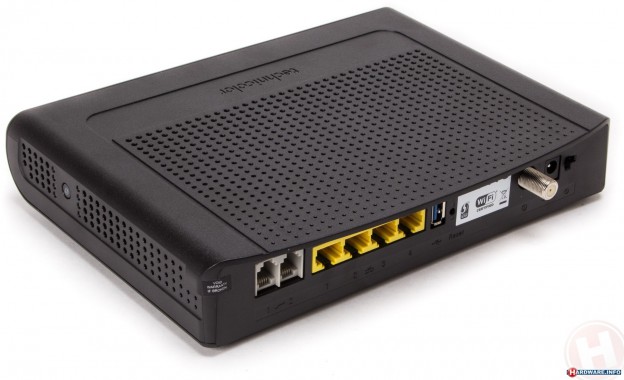
Few notes on UPC/Virgin Media Ireland's Technicolor TC7200

Update 2015/10/03: It’s Virgin Media now? Alrighty then. updates title

Update 2015/01/03: You are probably here for one reason: how to use SNMP to switch this router to bridge mode? As this is unsupported by UPC Ireland, let’s hope they don’t spoil the fun for us. (After posting the main body of the post, I actually got a proper DD-WRT friendly router and have started using this.) So here’s what you’re interested in.

To switch the device into pure modem, non-routing mode, you use:

snmpset -v2c -c public 192.168.100.1 1.3.6.1.4.1.4413.2.2.2.1.7.1.1.0 i 1

Additionally, concerning IPv6, at no later time have I observed receiving an IPv6 globally routable address, so I guess that was a lucky hiccup.


Based on this thread which I ran into here. These are just notes; if you can learn something from them, do so; but please be careful and fully aware that these are not instructions — merely notes for my own personal use in the future. I do not recommend you follow the notes; quite the opposite.

Despite (according to their reps on Twitter) telnet being unsupported by UPC, you can easily telnet 192.168.100.1 and use username: webstar, password: webstar to log into the console. There isn’t much to do there, sadly. Apparently you may be able to use the set command to control SNMP settings.

Some configuration of hidden features can be done via SNMP. I highly advise you not to do that. This is unsupported by UPC, and you might be unable to restore settings to the previous state.

To switch the device into pure modem, non-routing mode, supposedly you use:

snmpset -v2c -c public 192.168.100.1 1.3.6.1.4.1.4413.2.2.2.1.7.1.1.0 i 1

This didn’t work for me immediately. It seems to work immediately after reboot. Also worth noting is the snmpwalk command:

snmpwalk -v2c -c public 192.168.0.1 1.3.6.1.4.1.4413.2.2.2.1.7.1.1.0

Note that the value of “1” means “modem mode” (also known as “bridge mode”), while “2” means “ordinary NAT+routing mode”.

Be very careful. Turning on “modem mode” breaks Wi-Fi. You may need to bring up a separate access point for Wi-Fi. You may have trouble restoring the setting. PUBLISHING OF THESE NOTES DOES NOT CONSTITUTE ENDORSEMENT TO ACTUALLY USE THEM.

Also, I was unable to restore the setting to “2” using SNMP. Hard reset by holding the reset button for 30 seconds worked. Unless you use it strictly as a modem, with another device that performs NAT and IPv6 routing, it isn’t worth switching to NAT mode. So please don’t do this unless you’re fully prepared for breakage of service and possibly annoying UPC (since they obviously don’t want people to play with this).

It’s interesting that UPC does assign a public, fully routable IPv6 /64 prefix. Too bad that it’s not exposed to regular users locked behind a NAT who cannot get direct access to the public Internet, and who have been locked out of it by a firmware that is seemingly arbitrarily restricted compared to the one used in Netherlands. UPDATE: Two sources have told me that they did not receive an IPv6 prefix or address. As I am not keeping my device in bridge mode, and I do not advise readers to do so either (unless they have very good reasons), I cannot and won’t verify this. You can opt to leave a comment on your success, but I want to be clear that neither my text, nor any comments below, represent any advice on my part.

It’s also interesting that the setting seems to have survived a factory reset through the web interface. Factory reset through web interface has, however, restored WiFi functionality, and it seems that WiFi and LAN are getting separate IP addresses. Factory reset by holding the reset button for 30 seconds is the actual hard reset and cleans up the setting for “modem mode”.

About downtime on my blog: lack of RAM and swap! Also, what is "swappiness"

Over the last few days I had a bit of downtime. I have no monitoring set up for the services, and I didn’t have problems on the previous server. But having migrated to DigitalOcean, it turns out that its default configuration does not provide a swap partition, and that 512mb is too little for Apache2 and MySQL (at least with configurations I had on the previous server).

Even after a bit of reconfiguration to tell both Apache2 and MySQL to back off a bit, every few hours Linux would choose MySQL as the “less important” process to kill, due to lack of memory. And MySQL would not automatically restart (because it’s not set up to do so).

So I’ve done some deleting of old hosted files (freeing up a bit of disk space) and have set up a 1gb swapfile (note that the instructions are intended for 256mb servers, hence creating a 512mb swapfile).

In the process, I learned about sys.vm.swappiness, which is a kernel setting that apparently controls when the kernel will decide to swap things to the swap partition or swap file. By default set to 60, as the article instructs I’ve set it to 0 (which makes sense, as I want swap to be used as rarely as possible). IBM also suggests 0 in KVM-based virtual machines which is also what DigitalOcean uses.

This article from 2007 suggests you may even want to increase it in some cases (when you have a lot of inactive jobs waiting to be run), and force kernel to more aggressively find unused memory pages that it can swap to the disk. This AskUbuntu answer has a good explanation on what swappiness means: a setting of 60 means that at 40% usage kernel will attempt to find inactive pages to swap, and a setting of 10 means that at 90% usage kernel will attempt to find inactive pages to swap. Wikipedia also has an article, which sadly does little to explain the actual mechanisms.

A better solution would be to force MySQL and Apache2 to use appropriate amounts of RAM (and abide by some absolute limits, such as 196mb+196mb). But that’s something I’ll play with on another day… there are more important things to work on right now. 😉

apr-1-config broken under Mavericks

UPDATE October 23 2013 As commenters point out below, simply installing Xcode 5.0.1 and its Command Line Tools is enough. I’ve finally got around to testing out the suggestion provided to me almost two weeks ago, and it worked.


The content below is preserved for posterity. Please just install Command Line Tools and see if that helps.

Is perhaps brew install serf or brew install subversion broken for you on Mavericks? Or generally apr-1-config seems to return spurious results referring to nonexistent locations in /usr/include or to OSX10.9.xctoolchain?

While Apple does not recommend touching any system file or folder as they may and will be overwritten during OS upgrade, consider editing the following lines:

-prefix="/usr"
+prefix="/Applications/Xcode.app/Contents/Developer/Platforms/MacOSX.platform/Developer/SDKs/MacOSX10.9.sdk/usr"
-CC="/Applications/Xcode.app/Contents/Developer/Toolchains/OSX10.9.xctoolchain/usr/bin/cc"
-CPP="/Applications/Xcode.app/Contents/Developer/Toolchains/OSX10.9.xctoolchain/usr/bin/cc -E"
+CC="/Applications/Xcode.app/Contents/Developer/Toolchains/XcodeDefault.xctoolchain/usr/bin/cc"
+CPP="/Applications/Xcode.app/Contents/Developer/Toolchains/XcodeDefault.xctoolchain/usr/bin/cc -E"

Now that I have serf package installed, all I have left to figure out (or get someone else to figure out!) is subversion. Only then I might have some hope of getting hgsubversion to work again and getting some work done without resorting to Subversion directly.

Spurious nonresponsive XMPP resource "Messaging XXXXXXX" under Google Talk/Hangouts

This information is prepared based on my understanding of XMPP systems, on the fact that Hangouts is not XMPP, and on the threads I linked to. I’ve sorted out the user-originating speculation that seems most useful. Hopefully I’ve given enough search-friendly keywords so someone saves time I’ve lost figuring out what’s the culprit.

By looking at XMPP resources (a fancy name for ‘connection identifiers’) using the most awesome XMPP client out there, Psi, and then digging around old Google Groups posts from late April and May 2013, all the way across the summer, I’ve identified the culprit of why my Google Talk account was appearing as “Away”.

If there is a resource connected to your gmail.com account called something similar to “MessagingXXXXXXX”, that’s the ‘new’ Google Hangouts (the one that doesn’t play nicely with XMPP). And quite possibly it’s the Android application for Google Hangouts.

That was hard to figure out because, among other things, the Hangouts service refuses to talk to my external non-Google XMPP accounts. So I was completely flabbergasted that I did not get a response to handcrafted request — not even an error — when, retrospectively obviously, that was Hangouts discriminating against my federated XMPP server. Oh well.

So yes, Google Hangouts stays connected even if the device you’ve logged into from is not. Apparently this is a connection that’s created internally, inside Google, from their Hangouts service to their Talk service — from the new IM tech to the XMPP tech. And if you try to trick the XMPP service to sign out Hangouts (for example, by creating a new connection with identical XMPP resource), the Hangouts will happily log back into XMPP in your name and present you as ‘away’. And messages intended to be stored offline will end up in Hangouts, never to be seen again unless you use Hangouts on other systems.

In threads I linked to, users claim clearing and reinstalling Hangouts might mean getting a new static per-device XMPP identifier. Others claim that clearing data for various subsystems (Google Play Services, Google Hangouts, etc), revoking two-factor codes, OAuth tokens and single-application-passwords might help.

Aside from turning on the device and logging out, the solution seems to be: wait for 30 days until the connection times out. So, do NOT wipe a device clean unless you’re ready to wait for 30 days to be signed off in front of your friends. Do NOT give the device out before you explicitly sign out of Hangouts (don’t just ‘restore’ it and wipe it).

Or it may just be easier to log out.

Which is what I did: I turned on the laptop, I fired up the VirtualBox machine where AndroVM was installed, and I signed out. (Imagine that: accidentally firing up Hangouts, force-shutting down the VM and then spending several night-time hours scratching your head and feeling miserable in all sorts of ways because technology is disobeying again. Ah.)