Mac App Store: "An unknown error has occurred", iCloud: "Unable to sign in because of a problem communicating with iCloud. " on genuine Mac

So perhaps you’re getting these errors?

iCloud
Unable to sign in because of a problem communicating with iCloud.
Try signing again.

App Store
An unknown error has occurred.

FaceTime
The server encountered an error processing registration. Please try again later.

Messages
The server encountered an error processing registration. Please try again later.

Perhaps you may say, “Gasp! This is supposed to be a hackintosh issue, and not an issue on genuine Macs!”

Fear not, my friend, if you have committed the ‘grievous sin’ of moving your Mac’s hard disk into another Mac. (As a penance, say 10 hailmarys quickly.) For you see, on occasion, Mac may get confused about your networking devices when you do this.

What do networking devices have to do with all this? If you read hackintosh forums, you’ll see that Apple seems to use your primary ethernet network card’s MAC address to identify the machine. And communicates the identity in some shape or form when you log into the aforementioned services.

Problem arises when your Mac’s primary ethernet card cannot be identified.

Cure for your transgression? Aside from those hailmaries, you’ll also want to delete (or move aside, or rename) /Library/Preferences/SystemConfiguration/NetworkInterfaces.plist. Then reboot. Behold! This file should be magically regenerated, and your access to iCloud and Mac App Store should be restored.

You’re welcome.

Naturally I’m not responsible if deleting this file harms your Mac, or if you do it yourself in process of deleting this file. Have an expert around. Then again, if you did move the disk around, you probably are the expert.

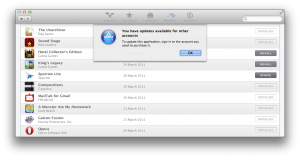
"To update this application, sign in to the account you used to purchase it."


Mac App Store started rejecting updates for some apps. It offers “Update” button, but then rejects updating. The dialog on the image is common if a different Apple ID was used to purchase the app… except if that were the case, it’d be mentioning the exact Apple ID it wants be to update with.

“To update this application, sign in to the account you used to purchase it.”

And, another problem: the apps were used using the only Apple ID I use for App Store purchases.

So far, the only certain recourse was to delete the app and redownload it. If it’s associated with my Apple ID (double-check that it is!) there is no problem — the app will be newly installed and you’re good to go. Updates also only appeared when I checked the “purchases” tab, not when I went to the “updates” tab.

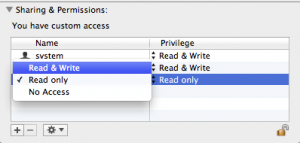
A hacker’s note: The wording of the error is strange. You see, it only mentions an account — which may refer to your local account as much as it can refer to an Apple ID. So I went and played with permissions, changing the permission for “everyone” to “read & write” for the application in question. For a few apps, update then went through. For a few, it didn’t.


The above is, naturally, from the “Get info” dialog on the app.

EDIT Oct 11 2012, 14:36 CET: User nikv has a helpful tip:

This error can happen if Settings -> Spotlight has the Macintosh HD in the Privacy section (not to be indexed). Reason being App Store uses Spotlight. If you don’t do this and Spotlight can index the Apps then it finds the updates and works okay.

EDIT Oct 11 2012, 14:58 CET: Also, while trying to figure out why Spotlight is so slow to starts indexing again on my machine, I found a thread that mentions the problem from my post. Their solution? Delete contents of /var/folders. Not the /var/folders directory itself, but its contents.

EDIT Oct 11 2012, 15:30 CET: You may need to restart your machine. (I just quit App Store.app, and killed storeagent process, but your mileage may vary.)

Unrelated but helpful tip: sudo opensnoop -n processname helps you see filepaths that a process accesses. Useful with mdworker.

Izgubljen novčanik/osobna – što sad?

Dovoljno puta mi se dogodilo da bi bio red da dokumentiram. Između ostaloga, radi sebe. Dosta neugodna situacija.

Prvo, ja sam posve odustao od toga da prijavljujem policiji. Predzadnji put pokušao sam prijaviti policiji na otoku Silbi, no kako je nemoguće iskopati jednog ili dva policajca koliko ih je nazovimo-to-dežurno na otoku, pokušao sam zvati telefonski i dobio policiju u Zadru. “A šta bi vi tili, da vam mi sad, ka, tražimo novčanik?!” Ukratko — nula bodova.

Drugo, malo pričekajte s prijavom nestanka kartica, za slučaj da se novčanik nađe — ali ne predugo. Tu procijenite sami. Da biste izvadili nove kartice u PBZu, potreban vam je dokument sa slikom. Ako nemate putovnicu, praktički jedini dokument ste upravo izgubili i vadit ćete ga preko mjesec dana. Ako nađete novčanik, bit će vam žao 50kn po kartici koliko PBZ (pravedno) uzme. Ipak! Ne previše odugovlačiti! Makar su kartice računa neupotrebljive bez PINa, PBZova kartica žiro računa je itekako upotrebljiva na Internetu. Ako imate American Express bez čipa, ta kartica prema mojem iskustvu traži samo potpis. Dakle, ne odgađati predugo.

A sad, kako do osobne.

Kako do nove osobne

Minimum minimuma je dva dana hodanja. Ne možete u manje od toga. Rezervirajte barem nekoliko sati u oba dana, primarno zbog čekanja u redu.

Dan prvi. Odlazite u policijsku upravu zaduženu za područje na kojem ste prijavljeni. Najvjerojatnije ista policijska postaja koja vam je izdala prethodnu osobnu iskaznicu – primjerice, u Petrinjskoj, ili (ako ste na području dijela kvarta Dubec, ili na području Sesveta), u Sesvetama.

Ponesite neki dokument tipa rodni list, makar vam vjerojatno neće trebati. Odmah kupite 70 kn u državnim biljezima. (Obično najbliža trafika kod policijske postaje ima biljege. Pitam se zašto.)

Ulazite unutra, stojite, dobivate od “tete na šalteru” formular za prijavu gubitka osobne iskaznice. Stanete sa strane, popunite ga u miru. Formular vas pita stvari poput OIBa, JMBGa, okolnosti pod kojima je osobna izgubljena, te da potvrdite da osobnu niste prodali, dali u zalog i slično.

Predajete popunjeni formular teti na šalteru zajedno s biljezima. Teta na šalteru vas upućuje da se vratite npr “sutra”, “prekosutra” ili “za tri dana”.

Međukorak. Možete obaviti slikanje za dokumente. Koliko sam ja upućen, slika za osobnu ne smije biti starija od 6 mjeseci. Neka vam ne pada na pamet pokušati “podvaliti” istu fotografiju za dokument koju ste predali prošli put, upravo zbog tog pravila; pred-predzadnji put sam otkantan kad sam pokušao dati istu, lijepu sliku, te sam se išao nabrzinu slikati. Recimo samo da sam prozvan MMK.

Dan drugi. Dolazite na šalter i predstavite se. Pokupite rješenje o proglašenju osobne nevažećom – komad papira A4 koji je državi od krucijalne važnosti da sami odnesete u Narodne Novine™ i predate kao “zahtjev za objavom oglasa o proglašenju osobne iskaznice nevažećom” – za što ćete biti oderani za 35 hrvatskih kunića. Posve mi je nejasno zašto efektivno državna institucija Narodne novine ne može surađivati s policijom dovoljno da uplatim policiji novce i da oni to srede. But I digress.

Odmah pokupite i formular kao zahtjev za izradu osobne iskaznice (OIB, JMBG, …) te uplatnicu na 48.50kn. Pripremite i par kuna više; FINA odere za dodatni 4.80kn, a tko zna kako je u drugim bankama i poštama. Internet bankarstvo bi bilo teoretski moguće, ali morali biste donijeti natrag i uplatnicu, ali i isprintanu potvrdu o uplati. Printati vam se, naravno, za 5kn razlike ne da.

Pitati tetu gdje su najbliže Narodne novine – recimo, u Sesvetama ih nema, pa ih možemo potražiti najbliže u Aveniji Dubrava 35 – kod Lidla. Što se tiče Petrinjske, najbliže Narodne novine su na famoznom ilitiga popularnom Trgu žrtava fašizma, i čak imaju zaseban odjel za objave oglasa. Put pod noge!

Stričeku u Narodnim novinama kažete zašto ste došli, predate mu papir, predate mu A4 papir, i mirni ste. On vam da natrag vaše rješenje o proglašenju, kao i račun vezan za objavu oglasa. Oboje predajete teti na šalteru.

Ako ga niste obavili dosad — sad možete svratiti na gore spomenuti međukorak ilitiga slikanje! Osobno sam dosta zadovoljan uslugom i ne poznajem osobno niti vlasnika niti ikoga od djelatnika — ali ako ste rješavali objavu oglasa u Aveniji Dubrava 35, mogu preporučiti Foto Studio Đurđica koji se nalazi odmah iznad Lidla. Kad kažem iznad, mislim iznad; skriveni su doslovce na brdu u Ulici Hrvatskog proljeća 15 preko puta ceste u odnosu na Lidl. Čekao sam 20ak minuta i platio 50kn, ali slike su odlično ispale, uz minimalno popravljanje slike (ne prepravljanje, što bi bilo zabranjeno, jel’). Oko 50kn je, čini se, standardna cifra kod fotografa onda kada izrađujete fotografije za dokumente. Možete proći jeftinije, no iovako ionako ste izgubili novčanik i trošit ćete hrpu love na povrat svega. A bar ćete imati par novih slika. (Whee!)

Konačno, vraćanje u policiju. (Whee! Još uvijek dan 2, nadajmo se, ako ste dovoljno rano ujutro krenuli.)

Čekate opet na šalteru. Teti predajete “uplaćenu uplatnicu”, dvije fotografije izrađene za osobnu iskaznicu, formular sa zahtjevom za izradu osobne iskaznice, rješenje o proglašenju osobne iskaznice nevažećom, račun za oglas o proglašenju osobne iskaznice nevažećom. Teta uzima žutu kartonsku karticu, popunjava, traži potpis na žutu kartonsku karticu, traži potpis na papir, traži otisak desnog kažiprsta (ponesite maramicu, salvetu ili nešto slično da obrišete tintu) i konačno uzima žutu kartonsku karticu i daje vam rok u kojem će osobna biti izrađena.

U nekim policijskim postajama/upravama/whatever pitat će želite li SMS dojavu kad je iskaznica gotova. U Sesvetama ne nude tu uslugu za osobnu iskaznicu.

Ukupni trošak? 155kn + fotografije 50kn. Oko 8h kombinirano u 2 dana potrošeno na čekanja u redu, vožnju po tramvajima i busevima, itd itd.

Kako do ostalih dokumenata?

Vjerojatno nikako dok ne dobijete osobnu iskaznicu. Ali…

Gubitak studentske “iksice” (odnosno ja imam iskustva samo s nasljednikom, ‘e-indeksom’) prijavljujete u studentsku referadu. To je mali problem ako su trenutno ljetni godišnji, ali što se može, menza iovako ionako ne radi, niti su predavanja u tijeku. Na FERu sam platio 100kn “kazne” za e-indeks, plus 35kn za objavu u Narodnim novinama, uz informaciju da sljedeći gubitak sankcioniraju sa 150kn. Ne sjećam se da li sam plaćao izradu novog e-indeksa. Na TVZu još nisam prolazio kroz postupak, jer je studentska referada na godišnjem.

Gubitak kartica u PBZu možete prijaviti telefonski već isti dan: 0800 365 365. PIN stiže kroz svega par dana na kućnu adresu. Nažalost, to apsolutno ničem ne služi jer morate podići karticu koristeći osobnu iskaznicu ili drugi dokument sa slikom. (Vozačka ili putovnica, koje ja, recimo, nemam.) Koliko se sjećam, naknade za izradu kartice skidaju se izravno s računa.

ZETov pokaz — uopće nemam pojma što s njim, i gubitak ovoga je najstrašnija stvar. Ovaj elektronički pokaz je toliki organizacijski promašaj da je to strašno. Nemam pojma što ću uopće s time i kada ću ići po njega. Naime, koliki su biseri, vjerojatno će inzistirati da pokažem (e-)indeks, jer nagađam da su nesposobni vidjeti da osoba s mojim imenom i prezimenom, OIBom, te karakterističnim licem i predivnim “osmjehom” uistinu već jest student i da je ta čudna individua već imala pokaz. To je samo nagađanje, ali mislim da neće to povezati.

Dalje, na izradu pokaza sam čekao tri tjedna… a za to vrijeme nisam mogao uplatiti 120kn. Da, tako je — izradu sam platio 30kn i čekao tri tjedna i za to vrijeme plaćao vožnju po redovitim cijenama. Naravno da k tome pokaz vrijedi od 1. do 31. u mjesecu, pa kad je bio izrađen, za 120kn sam mogao platiti pola mjeseca vožnje, ili nastaviti plaćati po redovitim paprenim cijenama. Očekujem slično se provesti i sada, kad sam izgubio taj krucijalni komad plastike koji je toliko fantastično bolji (za praćenje kretanja nazovi-slobodnih građana) od komada papira i plastike koji smo prethodno imali, a koji sam dobio za prestrašno dugih 5 minuta po ulasku u njihov ured u Remizi.

No o ZETovim manama kao vjerojatno najnesposobnijoj državnoj firmi jednom drugom prilikom u nekom drugom dugačkom postu. (Sad jedva čekam “je al nije državna neg gracka striček Vuč’ca… i nema ZETa nego Zagrebački holding striček Vuč’ca…” — yeah right: same difference.) To što je javni prijevoz u drugim gradovima u još većoj banani nikako ne može i ne smije značiti da možemo tolerirati ZETove igrarije i skupoću izazvanu novim tramvajima, aparatima za “cvikanje” (Linux, by the way), bezobrazluk (vjerojatno i preplaćenost) zaposlenika, prečestim polupraznim vožnjama, kršenje privatnosti bilježenjem “svakog” ulaska u vozilo (kako nas podsjeća striček na svakom stajalištu!), iritantno puštanje “ZET radija”, itd.

Idemo dalje!

Upute za budućnost

Otvorite mobilno bankarstvo. Ja sam se spasio tako da sam prenio kolegi dio novca preko mobitela, jer za razliku od Internet bankarstva ne trebam karticu.

Ostavite barem jednu bankovnu karticu kod kuće.

Nabavite putovnicu. Jest da dođe oko 400kn (320kn + 70kn biljega), ali ako izgubite novčanik, bit ćete presretni što imate bar jedan dokument sa slikom za dokazivanje identiteta. I dalje morate prolaziti ovaj gore navedeni postupak, ali u kombinaciji s bankovnom karticom koja je kod kuće, bar nećete ostati bez novca. A da ne spominjemo da u slučaju potrebe nećete trošiti dodatne novce na “hitnu izradu” putovnice, ako baš žurno morate ići u inozemstvo negdje gdje vam nije dovoljna hrvatska osobna iskaznica za prelazak preko granice.

Ostavljajte stvari kod kuće, jer usprkos oprezu, dovoljno je da se malo zamislite ili da netko u blizini ima spretne prstiće kako biste prolazili horor. Osobnu iskaznicu ne možete ne nositi (koliko znam, protuzakonito, je li), no možete pokušati ne nositi baš sve bankovne kartice.


ŠTO KAD JE NOVČANIK PRONAĐEN? (update 23. kolovoza 2012)

Pred nekoliko dana stigla mi je obavijest na kućnu adresu da se javim u Policijsku postaju “vezano za novčanik”, uz dobilježeno da donesem “pristojbu od 20kn”.

Odmah sljedeći dan ujutro otišao sam, i stvarno, novčanik je pronađen. 20kn se odnosi, naravno, na biljege. Šteta što je skoro sve bilo otkazano, osim pokaza, iksice i studentservisne članske iskaznice.

Mini-explanation of BFS and DFS

Disclaimer: all code in this post is untested-as-posted, but hopefully illustrates some basic concepts. Also, compared to a few of the folks I know, I suck at “algorithmic problems” such as these (i.e. those used on algorithm competitions such as IOI, Code Jam, Topcoder, etc) – so the solutions are almost certainly suboptimal. Post your own solutions in comments.

So you need to perform a search within fenced area in a 2D array of data. Searching includes counting for objects you want to find and flood-filling this area. Think “bucket” in various raster painting programs that fill pixels until reaching a fence – a “different” color. There are two primary algorithms to do this.

Depth-first search

DFS or depth first search goes as deep as possible in a particular direction before reaching fence and backing off just as much is needed to change the direction. It’s implemented using a stack. Due to this, it commonly involves simply using recursion to explore surroundings of the “current” tile. (Let’s use “tile” as a name for cells of a 2D array.) Each tile is an entry on the stack — when implemented via recursion, it’s a single function call or a ‘stack frame’.

In the code below, I’ll be using a one-dimensional array. Two-dimensional arrays have… semantical particularities that I prefer to avoid.

#define WIDTH 16
#define HEIGHT 7
char field[WIDTH*HEIGHT] = 
  "................" // This is a single string.
  "...#######.###.." // It's perfectly valid to break them like this.
  "..##.....###.#.." // Also, never forget: C strings are arrays of characters.
  "..#..........#.."
  "..############.."
  "..#.#..........."
  "..###...........";

void dfs(int x, int y)
{
  if(field[y*WIDTH + x] != '.')
  {
    // we can't do anything here, tile is not 'empty'.
    return;
  }
  
  // do whatever you want to do here...
  // for example, fill tile with a different character.
  // in your paint program, that'd be a different color
  field[y*WIDTH + x] = '!';

  // now let's spread further.
  // in case we should not have spread there, we'll
  // abort when we get there.
  dfs(x, y-1); // up
  dfs(x, y+1); // down
  dfs(x-1, y); // left
  dfs(x+1, y); // right;
}

int main()
{
  dfs(6, 3);
  return 0;
}

Before utilizing this algorithm, consider that stack may not be as large as you may want it to be, so recursively calling like this might not be a good idea.

dfs(6, 3) makes the algorithm begin somewhere within the large fenced area. (Can you figure out where?) As implemented, it paints the current tile, goes up, paints the current tile, goes up, gives up and steps back, goes down, gives up and steps back, goes left, paints the current tile, goes up, gives up and steps back, goes down, fills the current tile, goes up, gives up and steps back, goes down, gives up and steps back, …

In other words, take a piece of paper and a pencil, and trace the algorithm yourself.

Algorithm terminates when all four tests have failed (and it’s bound to happen eventually, since you’ve been coloring the tiles you’ve covered all along).

If you’re not modifying underlying data, you’ll want to have an additional array filled with “not covered” marks (e.g. boolean value of false – perhaps memset() to zero). As you pass certain tiles, you mark them as having been handled, and you use the “must be not covered” as an additional fencing condition.

Breadth-first search

BFS or breadth first search has a somewhat more natural search order. Like a bucket of spilt water, it spreads from the point where it started, instead of weirdly going into a single direction, then spreading around while it’s backing off. (Again, use paper and pencil and draw both algorithms if you can’t visualize the behavior.)

BFS involves the use of a queue in place of a stack. It can’t be implemented recursively; instead, you can think of it as a “list of tasks we want to execute in the future, first come, first served” (or FIFO – first in, first out).

So, since the earliest tiles were queued earliest, they’ll be processed earliest.

In this example, I’ll only show you the new bfs() function. For implementing the queue, I’ll use STL vectors, since I’m too lazy to code queue myself and I’m too lazy to look up a proper data structure offered in STL.

struct bfs_task // define data type "bfs_task".
{
  int x, y;
};

void bfs(int x, int y)
{
  std::vector bfs_queue;

  // add initial position to the task queue
  bfs_queue.push_back((bfs_task){.x = x, .y = y});

  // start rolling over the queue.
  // not using iterators since we'll be modifying the vector,
  // which would break the iterators.
  while (bfs_queue.size()) // at least one task in the queue
  {
    bfs_task currentTask = bfs_queue[0];
    int x = currentTask.x, y = currentTask.y;

    // remove the first task
    bfs_queue.erase(bfs_queue.begin(), bfs_queue.begin()+1); 
    // note! the line before actually copies everything "one element up".
    // but I'm too lazy to look up an optimal STL template to use.
    // I don't use C++ daily anymore, and this was a quickly written post.

    // can we be here? if not, skip
    if(field[y*WIDTH + x] != '.')
    {
      // we can't do anything here, tile is not 'empty'.
      return;
    }

    // do whatever you want to do here...
    // for example, fill tile with a different character.
    // in your paint program, that'd be a different color
    field[y*WIDTH + x] = '!';

    // now let's spread further.
    // in case we should not have spread there, we'll
    // abort when we get there.
    // please note: we're actually just queueing tasks for future use.
    bfs_queue.push_back((bfs_task){.x = x, .y = y-1}); // up
    bfs_queue.push_back((bfs_task){.x = x, .y = y+1}); // down
    bfs_queue.push_back((bfs_task){.x = x-1, .y = y}); // left
    bfs_queue.push_back((bfs_task){.x = x+1, .y = y}); // right
  }
}

Once again: std::vector is a bad data structure to use here due to slow .erase().

Breadth-first search on Wikipedia
Depth-first search on Wikipedia

Exploring Apple's customization of titlebar in Xcode 4

As you may have noticed, Xcode’s NSWindow does not actually have a single representedURL; it has two, the project and the current in-project file.

So how did Apple achieve that?

First things first, you can start figuring that out by yourself by asking your window’s contentView for its superview. Although undocumented, enough apps seem to be playing around with this (including Xcode) that I presume Apple would be reluctant to change something important here.

Second, I’m not going to actually show you any code just yet. Perhaps in a future blog post; I did start writing something, but it’s unfinished.

Third, there is no third: let’s get to it.

Hacking tools

Playing with contentView‘s superviews can only get you so far (although, you may be able to hack something anyway). Injecting code in form of plugins into Xcode is possible, as proven by JugglerShu’s XVim.

But there’s a nicer way.

Say hello to F-Script. It’s a nice scripting language and let’s-call-it mini-IDE in itself, but there’s something far more powerful it can do.

On F-Script

It has a full fledged object browser that uses introspection to figure out what the hell exists in the view hierarchy. It also has a nice view picker so you can easily access the exact view that you’re playing with. Python may be neat for programming, but this one is just smashing for debugging GUI apps.

F-Script is not intended to be used as a standalone dev environment however; you’re supposed to put it into your app and use it at runtime. Kind of like what you can do with Python already… except this one comes with a runtime debugging GUI out of the box (and the aforementioned view picker!), and is pretty dedicated to playing with Cocoa and Objective-C (while Python can play with it through its PyObjC bridge – powerful, but not the best way to do it; also, method names become lengthy and weird when written in Python).

Note that I, for now, have absolutely no experience with F-Script as a programming language, and I don’t intend to learn it too much for now, just as I don’t intend to learn all nuts and bolts of GDB. It may be nice, but for now, it’s far, far, far more amazing as a debugging tool.

Okay, so where does playing with Xcode come in?

Unfortunately, not in the form of injecting the debugging code into Xcode and playing with it. This is the loveliest part of F-Script, however; you can inject it into any app and inspect how it works, see runtime class definitions, send messages to existing objects, etc. But not with Xcode, because of some magic that Xcode is doing causing F-Script to crash Xcode.

Side note: injection of F-Script is done via gdb. The F-Script Anywhere automator workflow intended to be put into ~/Library/Services actually consists of figuring out frontmost app’s process ID, constructing some gdb commands and running gdb. gdb commands used involve attach to existing process, then calling Objective-C method -[NSBundle load] on /Library/Frameworks/FScript.framework, and finally calling +[FScriptMenuItem insertInMainMenu] and detaching. Quite ingenious!

Finding the beast

Let’s get back to business. Although Xcode crashes, view inspector of F-Script works long enough to let us know the name of the class implementing the custom view Apple uses in the titlebar for displaying two “represented URLs”. A-ha! DVTDualProxyWindowTitleView, we’ve found you!

Now, where could this be defined? Let’s explore various private frameworks found in Xcode using class-dump (install it from MacPorts). And voila! Xcode.app/Contents/SharedFrameworks/DVTKit.framework. Using class-dump we can also see that it’s used in… DVTDualProxyWindow, a subclass of NSWindow. Wonderful!

Now, just trying to load this framework into standalone F-Script.app fails miserably and returns NO. At least for me. otool -L told me which frameworks this one depends on… so I loaded them first.

About the beast

Finally, DVTDualProxyWindow is a subclass of NSWindow which apparently overrides -setTitle: to do nothing, overrides -setRepresentedURL: to be used for the ‘project’ URL, and defines new method -setSecondaryRepresentedURL: to add the ‘document’ URL. Both of these methods are just talking to DVTDualProxyWindowTitleView. We don’t really care what happens behind the scenes; it’s just a regular view. But let’s see if it works.

Open F-Script app. Right click on the toolbar and choose ‘Customize’. Aside from customization sheet, a new window appears titled ‘Custom Buttons’. Pick one of ‘CustomX’ buttons, and select ‘Block…’. (Of course, prior to that, in the toolbar customization sheet, drag the picked button to the toolbar… you know, so you can click it.)

Now, paste in the following code.

Testing the beast

[:selectedObject | 


(NSBundle bundleWithPath:'/Applications/Xcode.app/Contents/SharedFrameworks/DVTFoundation.framework') load.

(NSBundle bundleWithPath:'/System/Library/PrivateFrameworks/DataDetectorsCore.framework') load.

(NSBundle bundleWithPath:'/System/Library/PrivateFrameworks/DataDetectors.framework') load.
(NSBundle bundleWithPath:'/System/Library/Frameworks/SecurityInterface.framework') load.
(NSBundle bundleWithPath:'/System/Library/Frameworks/Carbon.framework') load.
(NSBundle bundleWithPath:'/System/Library/Frameworks/CoreServices.framework') load.

errorPointer := FSObjectPointer objectPointer.
(NSBundle bundleWithPath:'/Applications/Xcode.app/Contents/SharedFrameworks/DVTKit.framework') loadAndReturnError:errorPointer.


" printing out an error: 
   errorPointer at:0.
"

"win := ((DVTDualProxyWindow alloc) init)."

win := DVTDualProxyWindow alloc initWithContentRect:(125<>513 extent:383<>175)
                                   styleMask:NSTitledWindowMask + NSClosableWindowMask + NSMiniaturizableWindowMask + NSResizableWindowMask
                                     backing:NSBackingStoreBuffered
                                       defer:NO.

(win setRepresentedURL:(NSURL fileURLWithPath:'/Applications/Xcode.app')).
(win setSecondaryRepresentedURL:(NSURL fileURLWithPath:'/Applications/Xcode.app')).


"Instantiate a button, put it in the window and configure it"
button := NSButton alloc initWithFrame:(247<>15 extent:90<>30).
win contentView addSubview:button.
button setBezelStyle:NSRoundedBezelStyle.
button setTitle:'Boo'.
button setKeyEquivalent:'\r'.

"An example of using F-Script blocks to handle click on button. Ignore it."
conversionScript := [(form cellAtIndex:2) setStringValue:(form cellAtIndex:0) floatValue * (form cellAtIndex:1) floatValue].

" From docs: "
"The [...] notation creates an object of class Block which represents a block of code that can be executed later (Block is an Objective-C class provided by the F-Script framework). In our block, we simply get the values of the fields in the user interface objects, perform the computation (simply involves multiplication) and put the result in a UI element.
"

"An example on how to add handling for button click. Ignore it."
"Make the script the target of the button.
The script will be evaluated when the user presses the button"
button setTarget:conversionScript.
button setAction:#value.


"Show window"
(win orderFront:nil).


]

Click on the ‘Run’ button, and type in ‘nil‘. (You don’t really care about the selectedObject, but I did not study F-Script long enough to avoid it.)

Hopefully this gives you enough idea to debug with, explore with, as well as an idea on how to implement dual-representedURL windows. Good luck and have fun! 🙂

Accessing contents of a directory with App Sandbox temporary file exception

If you really, really need access to a path that Apple doesn’t want you to access while sandboxed (i.e. everywhere except what user selected, or a few paths like Documents, Music, Downloads) — you need to add a temporary file exception entitlement.

While these are intended as a stop-gap measure and are not intended for long-term use, they may help you solve your short-term problem.

How to use

After adding entitlements to your app (by marking that checkbox in Xcode), and after turning on Sandbox (again, by marking another checkbox in Xcode), you can see that a new plist-formatted file has appeared in your project with a single entry, com.apple.security.app-sandbox set to true.

Now add a new entry com.apple.security.temporary-exception.files.home-relative-path.read-only (or any of the other combinations of home-relative-path, absolute-path, read-only and read-write). Its type needs to be Array, and its contents need to be Strings.

I only used a single read-only, home-relative path. It needs to be formatted as follows: /Library/Somewhere/Some Data/

Gotchas

First of all… as mentioned, it’s not a String value, it’s an Array value containing strings.

Second… with NSFileManager, you are getting actual values for the first level of contents (e.g. folders), but when accessing subfolders you’re getting nil returnvalue and the error set to The file “2011-07-28” couldn’t be opened because you don’t have permission to view it.? Heh. See that slash on the end? It NEEDS to be there. It absolutely, 100% needs to be there, or else you’re getting the aforementioned permission denied error.

Third… you may be wondering, “How the hell am I going to get the user folder? NSHomeDirectory() is returning a path inside the sandbox container, and so do all other methods!”

Sure, if you stick to Cocoa. Apple has wrapped everything nicely, and I actually commend them on thoroughness. Even getpwent() returns incorrect values – I got /var/virusmail as the home folder.

There’s one thing that does return the username, however: NSUserName(). Don’t be easily tempted to construct the path by simply prepending /Users/. On my external drive, I tend to keep “recent cats” and “future cats”, in order to try everything out, but avoid breaking my workflow. However, it’s worthless unless I bring over the home folder, so on that installation, my home folder is not /Users/ivucica but /Volumes/Macintosh HD/Users/ivucica. Be careful, and use this solution.

#include 
#include 

NSString * IVHomeDirectory()
{
  const struct passwd * passwd = getpwnam([NSUserName() UTF8String]);
  if(!passwd)
    return nil; // bail out cowardly
  const char *homeDir_c = getpwnam([NSUserName() UTF8String])->pw_dir;
  NSString *homeDir = [[NSFileManager defaultManager] 
                      stringWithFileSystemRepresentation:homeDir_c
                      length:strlen(homeDir_c)];
  return homeDir;
}

// simple drop-in replacement for NSSearchPathForDirectoriesInDomains(NSLibraryDirectory, NSUserDomainMask, YES);
NSArray * IVLibraryDirectory()
{
  NSArray * libraryDirectories = [NSArray arrayWithObject: [IVHomeDirectory() stringByAppendingPathComponent:@"Library"]];
  return libraryDirectories;
}

Above solution is inspired by this answer on StackOverflow.

If this helped you, leave me a comment here, and perhaps upvote those comments I made on StackOverflow. Everyone deserves encouragement now and then, right? 🙂